
B站代码解读 — LRUCache
0x01. 说明
- 本文源码来源于互联网,本人保证公开部分不涉及任何公司的敏感信息,本人保证不传播任何敏感信息。
- 本文仅用于学术交流,请勿在商业用途中使用此源码,此源码并未执行任何开源授权。
0x02. 介绍
LRU全称为Least Recently Used,为内存管理算法的一种。通过淘汰最近最少使用的KEY来实现内存置换。
LRU的规则是最近调用的key排在列表的最前面。例如:set 3,set 4,set 5, 内存中key的排列应该是 543。然后get 4,内存刷新为453,再set 1,内存刷新为145。【注,排列顺序为阅读顺序,最左边为顶部】
从描述中可以看出,最近读取,最近更新的key,会排到队列的最顶部,该key之前的首尾会连接起来保持顺序。那么实现这种数据结构成为双向链表。
对于双向链表,了解数据结构的同学肯定不陌生,本着解读的目的,我们来介绍下什么是双向链表。
链表是一种物理存储单元上非连续、非顺序的存储结构,数据元素的逻辑顺序是通过链表中的指针链接次序实现的。
链表由一系列结点(链表中每一个元素称为结点)组成,结点可以在运行时动态生成。
每个结点包括两个部分:一个是存储数据元素的数据域,另一个是存储下一个结点地址的指针域。双向链表也叫双链表,是链表的一种,它的每个数据结点中都有两个指针,分别指向直接后继和直接前驱。所以,从双向链表中的任意一个结点开始,都可以很方便地访问它的前驱结点和后继结点。
有一点需要注意的是,队列的顶部和底部并不是相连的(LRU不是循环双向链表),所以我们需要有一个head指针,和tail指针来保存头尾信息。
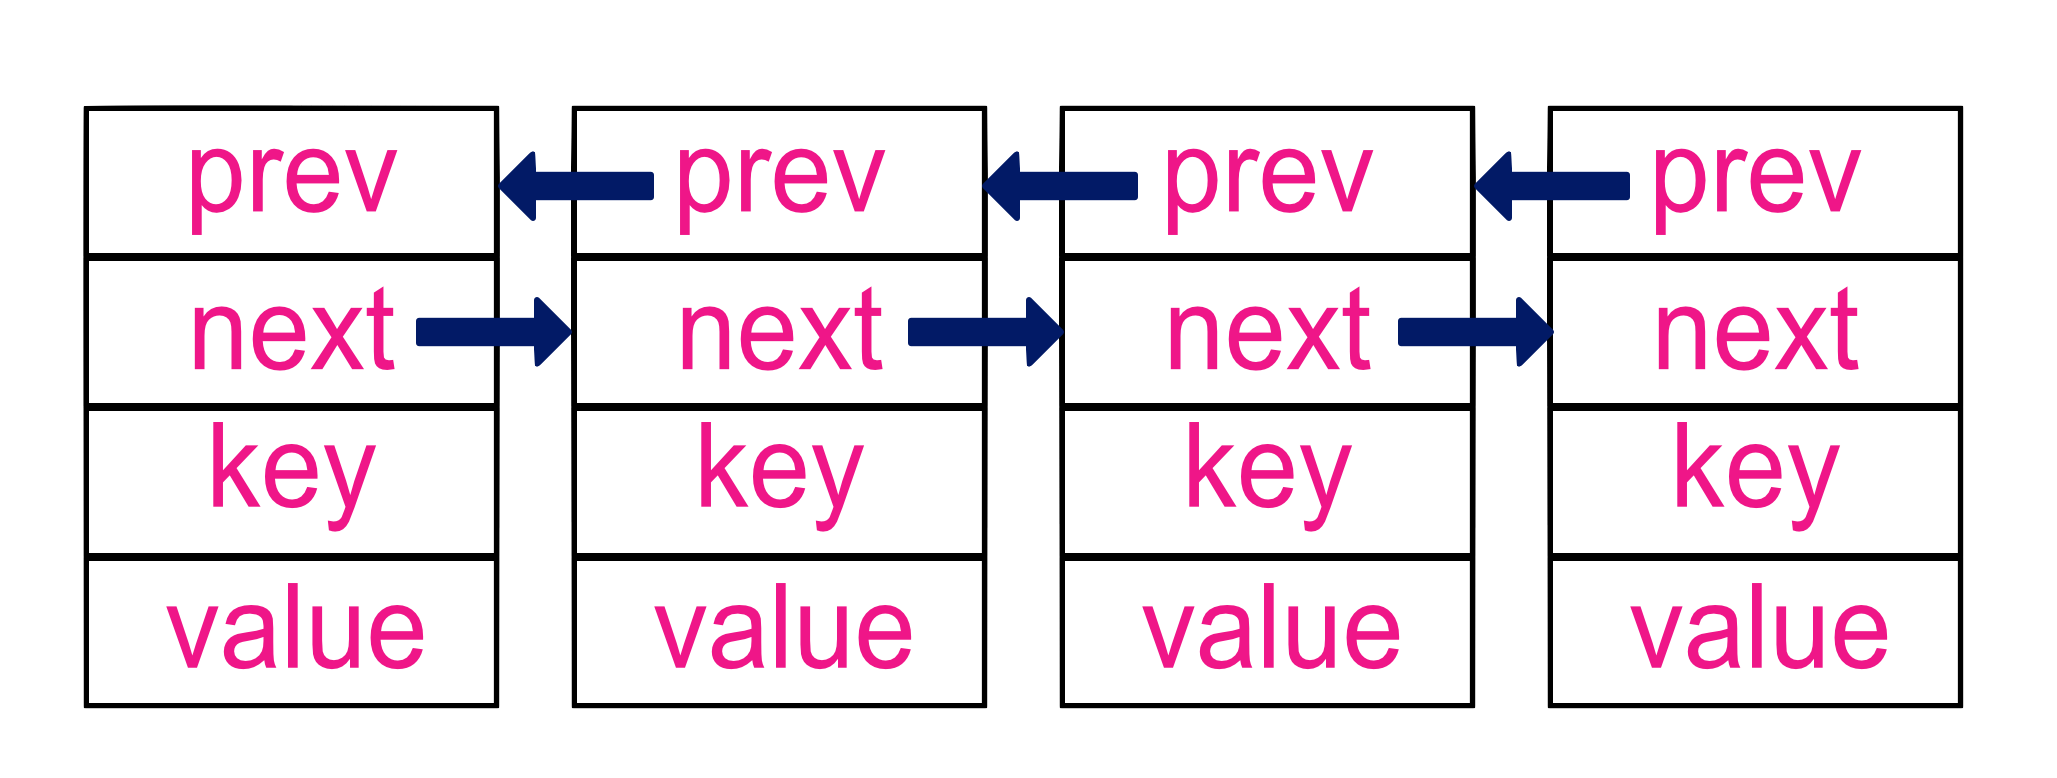
对于双向链表的实现不是本文讨论的重点,在这里略过。我们重点是解读LRU的实现。
0x03. LRU Cache实现
从上面的示意图中,我们需要定义一个结构体,包含四个元素,next指针,prev指针,key和value字段。在golang中可以使用interface{}作为泛型支持。
实现如下:
type Element struct {
    prev, next *Element
    Key        interface{}
    Value      interface{}
}
整个LRUCache的结构如下,head为头指针,tail为尾指针,capacity为队列长度,【为什么要指定长度,因为是内存置换,属于虚拟内存,所以肯定是要限制长度来使用的】。
cache 为字典结构存储Element元素(以我的理解其中Element.key 为冗余设计,应该是可以省略Element.key字段)。
type LRUCache struct {
    cache    map[interface{}]*Element
    head     *Element
    tail     *Element
    capacity int
}
那么剩下的就是实现几个方法,『内存开辟』,『设置值』,『更新队列』,『删除元素』。具体实现可以看下面的源代码
package lrucache

// Element - node to store cache item
type Element struct {
    prev, next *Element
    Key        interface{}
    Value      interface{}
}

// Next - fetch older element
func (e *Element) Next() *Element {
    return e.next
}

// Prev - fetch newer element
func (e *Element) Prev() *Element {
    return e.prev
}

// LRUCache - a data structure that is efficient to insert/fetch/delete cache items [both O(1) time complexity]
type LRUCache struct {
    cache    map[interface{}]*Element
    head     *Element
    tail     *Element
    capacity int
}

// New - create a new lru cache object
func New(capacity int) *LRUCache {
    return &LRUCache{make(map[interface{}]*Element), nil, nil, capacity}
}

// Put - put a cache item into lru cache
func (lc *LRUCache) Put(key interface{}, value interface{}) {
    if e, ok := lc.cache[key]; ok {
        e.Value = value
        lc.refresh(e)
        return
    }

    if lc.capacity == 0 {
        return
    } else if len(lc.cache) >= lc.capacity {
        // evict the oldest item
        delete(lc.cache, lc.tail.Key)
        lc.remove(lc.tail)
    }

    e := &Element{nil, lc.head, key, value}
    lc.cache[key] = e
    if len(lc.cache) != 1 {
        lc.head.prev = e
    } else {
        lc.tail = e
    }
    lc.head = e
}

// Get - get value of key from lru cache with result
func (lc *LRUCache) Get(key interface{}) (interface{}, bool) {
    if e, ok := lc.cache[key]; ok {
        lc.refresh(e)
        return e.Value, ok
    }
    return nil, false
}

// Delete - delete item by key from lru cache
func (lc *LRUCache) Delete(key interface{}) {
    if e, ok := lc.cache[key]; ok {
        delete(lc.cache, key)
        lc.remove(e)
    }
}

// Range - calls f sequentially for each key and value present in the lru cache
func (lc *LRUCache) Range(f func(key, value interface{}) bool) {
    for i := lc.head; i != nil; i = i.Next() {
        if !f(i.Key, i.Value) {
            break
        }
    }
}

// Update - inplace update
func (lc *LRUCache) Update(key interface{}, f func(value *interface{})) {
    if e, ok := lc.cache[key]; ok {
        f(&e.Value)
        lc.refresh(e)
    }
}

// Front - get front element of lru cache
func (lc *LRUCache) Front() *Element {
    return lc.head
}

// Back - get back element of lru cache
func (lc *LRUCache) Back() *Element {
    return lc.tail
}

// Len - length of lru cache
func (lc *LRUCache) Len() int {
    return len(lc.cache)
}

// Capacity - capacity of lru cache
func (lc *LRUCache) Capacity() int {
    return lc.capacity
}

func (lc *LRUCache) refresh(e *Element) {
    if e.prev != nil {
        e.prev.next = e.next
        if e.next == nil {
            lc.tail = e.prev
        } else {
            e.next.prev = e.prev
        }
        e.prev = nil
        e.next = lc.head
        lc.head.prev = e
        lc.head = e
    }
}

func (lc *LRUCache) remove(e *Element) {
    if e.prev == nil {
        lc.head = e.next
    } else {
        e.prev.next = e.next
    }
    if e.next == nil {
        lc.tail = e.prev
    } else {
        e.next.prev = e.prev
    }
}
解搜索二维矩阵题
今天我来讲下我做这道题的思路吧。原题点击此处跳转 。
下面是具体的题目:
编写一个高效的算法来搜索 m x n 矩阵 matrix 中的一个目标值 target。该矩阵具有以下特性:
每行的元素从左到右升序排列。
每列的元素从上到下升序排列。
示例:现有矩阵 matrix 如下:
 [
 [1,   4,  7, 11, 15],
 [2,   5,  8, 12, 19],
 [3,   6,  9, 16, 22],
 [10, 13, 14, 17, 24],
 [18, 21, 23, 26, 30]
]
给定 target = 5,返回 true。
给定 target = 20,返回 false。
看似很平常的题,逐行搜索也可以解决,但是题目中要求使用高效的算法,所以本题的解题思路肯定是不是两层for循环那么简单。
结合题目描述二维矩阵有『从左往右,上往下是递增』的规律,可以摸索出,我们只要横着扫一行,竖着扫一列,便可以大致确定范围,例如题目中的target = 5,在第一行中小于等于5的只有1,4两个数,在第一列中小于五的数只有1,2,3三个数,那么搜索的范围就可以确定为 一个2*3的矩阵。相比5*5是不是范围小了很多。
但是!
这就是最高效的算法吗?接下来我们算示例中给的第二个target=20, 我们发现第一行全都小于20,第一列全都小于20,看来还是要遍历整个矩阵了。所以上面那种思路并不能算是高效的(因此便不放代码)。那么对于target=20这种输入,该如何优化呢?
我们再来抠题目中的『从左往右,上往下是递增』的规律,那么我们一开始搜索每行最右边的数字,判定他与目标值的关系,假如最右边的值小于目标值,根据题目中的规律,这一行都不用搜索了,肯定比目标值小。假如最右边的值大于目标值,我们便向右边搜索,因为往下搜索已经是永远大于目标值了。根据这个条件我们对于target=20的搜索路径为15->19->22->24->30->26->23->21->18,只需要搜索9次,便可以给出答案。是不是比搜索25个值快多了。同样对于target=5的输入,我们的搜索路径为15->11->7->4->5,也不用像前面提到的搜索行与列确定范围那么麻烦。
下面是我写的代码
bool Solution::searchMatrix(std::vector<std::vector<int>> &matrix, int target) {

    if (matrix.size() == 0 || matrix[0].size() == 0 || matrix[0][0] > target ||
        matrix[matrix.size() - 1][matrix[0].size() - 1] < target) {
        return false;
    }

    int h = matrix.size();// i
    int w = matrix[0].size(); // j

    int i = 0, j = 0;
//    int l = 0;
    for (i = 0; i < h; i++) {

        if (matrix[i][w - 1] < target) {
//            std::cout << w-1 << ",-" << i <<"," <<l<<std::endl;
//            ++l;
            continue;
        }
        for (j = w - 1; j >= 0; j--) {
//            std::cout << j << ",-" << i << "," << l << std::endl;
//            ++l;

            if (matrix[i][j] == target) {
                return true;
            } else if (matrix[i][j] < target) {
                break;
            } else {
                w = j;
            }
        }

    }

    return false;
    }
}
注释的l变量是用来打印搜索路径的。
我们看下搜索路径图(原点是第一个元素,矩阵向右,和向下延伸)

测试无误之后,提交。然后再去看大神的代码。然后发现我和大神代码之间差了好几个卧槽。
bool Solution::searchMatrix(std::vector<std::vector<int>> &matrix, int target) {
    // int l = 0;
    int n = matrix.size();
    if (n == 0)
        return false;
    int m = matrix[0].size();

    for (int c = 0, r = m - 1; c < n && r >= 0;) {
        // std::cout << "" << r << ",-" << c << "," << l << std::endl;
        // ++l;
        if (matrix[c][r] > target) {
            --r;
        } else if (matrix[c][r] < target) {
            ++c;
        } else
            return true;
    }
    return false;
}
因为思路是一样,所以搜索路径是一样的,这里就不放图了。但是代码要精简很多,值得学习。